Rates of chemical reaction II: rate and order of H2O2Decomposition
1. Why were you instructed to keep swirling the Erlenmeyer flask?
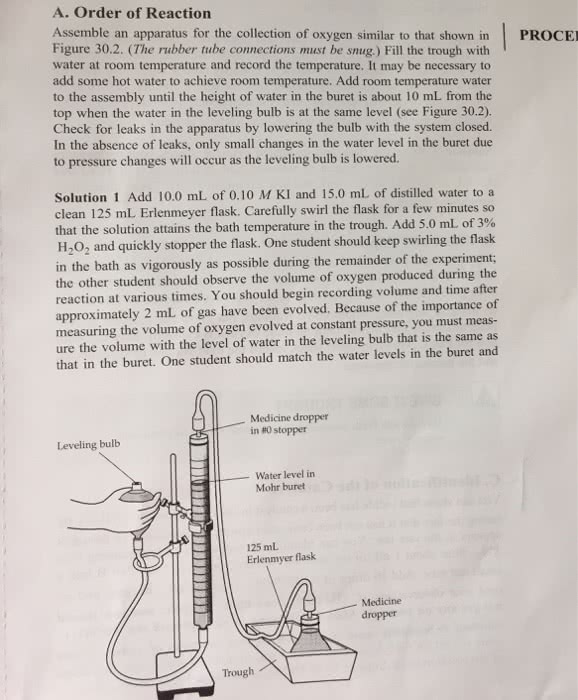
A. Order of Reaction Assemble an apparatus for the collection of oxygen similar to that shown in PROCE Figure 30.2. (The rubber tube connections must be smug) Fill the trough with water at room temperature and record the temperature. It may be necessary to add some hot water to achieve room temperature. Add room temperature water to the assembly until the height of water in the buret is about 10 mL from the top when the water in the leveling bulb is at the same level (see Figure 30.2). Check for leaks in the apparatus by lowering the bulb with the system closed. In the absence of leaks, only small changes in the water level in the buret due to pressure changes will occur as the leveling bulb is lowered. Solution 1 Add 10.0 mL of 0.10 M KI and 15.0 mL of distilled water to a clean 125 mL. Erlenmeyer flask. Carefully swirl the flask for a few minutes so that the solution attains the bath temperature in H202 and quickly stopper the flask. One student should keep swirling the flask in the bath as vigorously as possible during the remainder of the experiment; the other student should observe the volume of oxygen produced during the reaction at various times. You should begin recording volume and time after approximately 2 mL of gas have been evolved. Because of the importance of measuring the volume of oxygen evolved at constant pressure, you must meas- ure the volume with the level of water in the leveling bulb that is the same as that in the buret. One student should match the water levels in the buret and the trough. Add 50 mL of 3% Medicine dropper in #0 stopper Leveling bulb Water level in Mohr buret 125 mL Erlenmyer flask Medicine dropper Trough
20 mL 3% Hydrogen peroxide, H2O2 15 mL Iodine-Potassium Iodide Solution, IKI (1% Iodine, 2% Potassium Iodide) 100 mL Beaker 10 mL Graduated cylinder 100 mL Graduated cylinder 250 mL Beaker (2) 250 mL Erlenmeyer flasks 1-Hole Rubber stopper 2-Hole Rubber stopper (2) 3 in. Rigid tubing pieces (1) 6 in. Rigid tubing 6 Pipettes
Stopwatch Permanent marker Waste beaker (any volume) *Access to graphing software *Access to a computer *24 in. Flexible tubing *Water *10 mL Distilled water
* You must provide
*You must cut this piece of tubing into two, 12 inch pieces. (if you have not already done so).
Procedure
Preparation of Apparatus
Set up apparatus as shown in Figure 2. To do this, begin by labeling the Erlenmeyer Flasks as 1 and 2. The reaction will take place in Flask 1.
Fill Flask 2 approximately three quarters of the way full with water.
Press the 2-hole rubber stopper into the top of Flask 2. Place one three in. piece and one six in. piece of rigid tubing into each hole of the rubber stopper. This should create an airtight system.
Place the one-hole stopper on Flask 1, and fit the remaining 3 in. piece of rigid tubing in the stopper hole.
Connect Flask 1 and Flask 2 with the two, 12 in flexible tubing pieces. One piece should connect Flask 1 to Flask 2, and the second piece should connect Flask 2 to the graduated cylinder. The tubing which connects Flask 2 to the graduated cylinder should be positioned low enough to be immersed in the water in Flask 2.
Figure 2:Apparatus set-up. Note this is a sample set-up and is not drawn to scale. Your specific equipment may vary slightly.
Part A: Preparation of Reactants
Pour five mL of the IKI solution into a 10 mL graduated cylinder.
Add five mL of distilled water to the graduated cylinder to bring the total volume to 10 mL. This is the 0.5% - 1.0% (diluted) IKI solution.
Pour 15 mL of 3% H2O2 solution into a 100 mL beaker.
Add five mL of distilled water to this beaker and mix with a stir rod. This is the 2.25% (diluted) H2O2 solution.
Part B: Performing the Reaction
Remove the stopper from Flask 1 and place five mL of the 3% (undiluted) H2O2 solution and 10 mL of the undiluted IKI solution provided into the flask. Immediately replace the stopper on the flask. Note: At this point, you should select an extra beaker (any volume) from your lab kit to use as an supplemental collection container beaker for Step 6. You do not need to use the beaker yet, but keep it in close proximity.
Swirl Flask 1 until you observe a steady dripping of water going into the 10 mL graduated cylinder. This could take 3 - 5 minutes. Check for leaks in the tubing or system if water does not start rising up the plastic tubing coming from Flask 2 and traveling towards the graduated cylinder within one minute.
Stop swirling Flask 1 when you notice the steady flow of water droplets. When you stop, the water drop -rate will significantly decrease (to around one drop every 5 - 20 seconds) and could take a few minutes to stabilize. If a steady flow of drops of water does not occur within a few minutes, swirl Flask 1 for 1 more minute and check again. Repeat this process until there is a steady flow of drops of water after you have stopped swirling Flask 1.
Quickly empty liquid that has collected in the 10 mL graduated cylinder and replace the empty cylinder back under the flexible tubing.
Allow the flow of drops to become steady again. This could take 1 - 3 mL of water.
Start timing once the drop rate is steady and the volume of water collected is at a whole number (such as three mL). Record the time in Table 1 each time 2 mL of is water displaced. Continue taking data until you have at least 10 data points (20 mL displaced). Note: Use the extra beaker (located in Part B: Step 1) to collect additional fluid when the volume of displaced water exceeds 10 mL.
Return the collected water from your 10 mL graduated cylinder to Flask 2. Ensure the seal is air tight.
Empty, clean and dry Flask 1 and the graduated cylinder.
Repeat Steps 1 - 8 for the following trial conditions: 5 mL 3% (undiluted) H2O2 mixed with 10 mL of 0.5%-1.0% IKI solution (placed in Flask 1); and, 5 mL of 2.25% H2O2 mixed with 10 mL of 1.0%-2.0% IKI solution (placed in Flask 1). Record the data in Table 2 and Table 3, respectively. Note: Clean the graduated cylinder and extra collection beaker before it is used to measure any additional reagents for Trial 2 or Trial 3; and, before it is used for collecting the water from the reaction in the apparatus.
Use a graphing software program to make a graph of each trial. The graph should demonstrate the relationship formed between time vs. mL of water displaced.
Find and record the slope and the inverse slope for each trial.
Table 1:10 mL Undiluted (1.0 -2.0%) IKI and 5 mL 3% H2O2
mL water displaced
Time (seconds)
2
4
6
6
8
10
12
14
16
18
20
22
Slope:
Inverse Slope:
Table 2:10 mL Diluted (0.5-1.0% IKI) and 5 mL 3% H2O2
mL water displaced
Time (seconds)
2
4
6
6
8
10
12
14
16
18
20
22
Slope:
Inverse Slope:
Table 3:10 mL Undiluted (1.0 -2.0%) IKI and 5 mL 2.25% H2O2
mL water displaced
Time (seconds)
2
4
6
6
8
10
12
14
16
18
20
22
Slope:
Inverse Slope:
Calculations
Post-Lab Questions
1. Determine the order of the KI in this reaction.
2. Determine the order of the H2O2 in this reaction.
3. Calculate the rate law constant.
4. What is the overall rate law?
5. When finding the order of H2O2, why was Trial 1 and Trial 3 used?
6. When finding the order of KI, why was Trial 1 and Trial 2 used?
7. Research and identify some alternative catalysts that could be used to accelerate the decomposition of hydrogen peroxide. Evaluate these catalysts and determine which option is