Note: For the calculations you will perform in the assignments you will assume that, because this solution is very dilute, its density is the same as pure water: 1 g/mL. Therefore, there are 20 mg of starch per mL in the 2% solution.
**Post Lab Question: Plot out your data using a Michaelis-Menton curve. Appropriately label the x- and y-axes (which also includes the appropriate units). Try to draw a best fit curve using your knowledge.
The experimental Data is listed below. In addition to the experimental instructions that were followed. I have updated the lab instructions. This was a LateNite Lab (website) assignment. Please answer the Post Lab question using the provided information. If you think the questio is too long, than anser as much of the qustion as you can. My professor considers this to b one question.
Data:
Experiment #1:
Cuvette #1: 1.03
Cuvette #2: 0.51
Cuvette #3: 0.26
Experiment #2:
Test Tube #1: 2.97
Test Tube #2: 4.69
Test Tube #3: 6.21
Test Tube #4: 7.21
Test Tube #5: 8.33
Experiment #3:
Test Tube #1: 1.03
Test Tube #2: 0.96
Test Tube #3: 0.36
Test Tube #4: 0.40
Test Tube #5: 0.83
Experiment #4:
Test Tube #1: 0.66 / Temperature 10 Celsius / pH 7.21
Test Tube #2: 0.24 / Temp 37 Celsius / pH 7.21
Test Tube #3: 0.33 / Temp 50 Celsius / pH 7.21
Test Tube #4: 1.03 / Temp 80 Celsius / pH 7.21
About This Lab
In this lab, you will use spectrophotometry to follow the reaction of the amylase enzyme on starch molecules. You will examine the effects that environmental pH and temperature have on the rate of amylase digestion of starch. This will be observed by using iodine to test for the presence of starch. Iodine interacts with starch to form a dark blue-black color. As amylase breaks down starch, less and less starch is present, so the color of the iodine test solution becomes lighter and lighter until only the amber color of iodine will be seen.
In order to stop the reactions at a specific time, a strong acid, HCl, is added to the amylase solution. As the pH falls below the functional pH of the enzyme the reaction stops.
Procedures
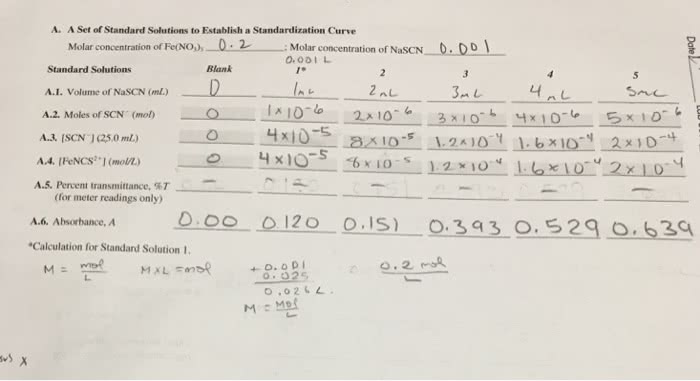
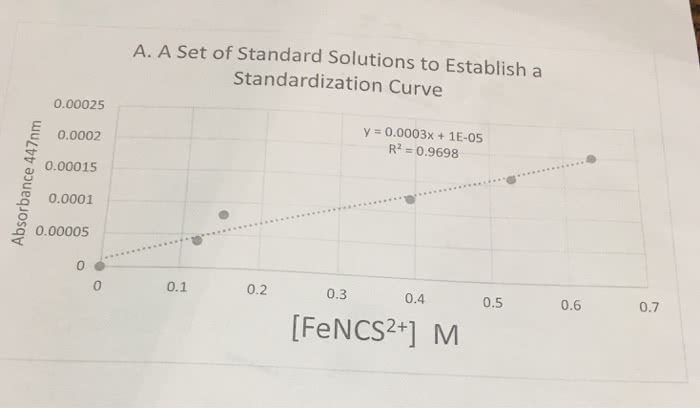
Experiment 1: Creating a Calibration Curve for Starch-Iodine Measurements
1 Take three cuvettes from the Containers shelf and place them onto the workbench.
2 Take an Erlenmeyer flask from the Containers shelf and place it onto the workbench.
3 Add 0.25 mL of the 2% starch solution from the Materials shelf to the Erlenmeyer flask. Note: For the calculations you will perform in the assignments you will assume that, because this solution is very dilute, its density is the same as pure water: 1 g/mL. Therefore, there are 20 mg of starch per mL in the 2% solution.
4 Add 99.75 mL of water from the Materials shelf to the Erlenmeyer flask to obtain a dilute solution that is 1/400th the concentration of the original 2% starch solution on the shelf.
5 Using the dilute starch solution from the Erlenmeyer flask on the workbench and the iodine solution found on the Materials shelf, fill the three cuvettes as follows:
6 Exp. 1 Cuvette Set-up
7 Cuvette Name
8 Dilute Starch Solution (mL)
9 Iodine (mL)
Cuvette #1: 4ml Dilute Starch; 1ml Iodine
Cuvette #2: 2ml Dilute Starch; 3ml Iodine
Cuvette #3: 1ml Dilute Starch; 4ml Iodine
Take a spectrophotometer from the Instruments shelf and place it onto the workbench. Using the control panel:
⦠Select the Vis button. A button that is selected has a gray background and blue font. The "Mode" should change to Vis in the view screen.
⦠Set the wavelength to 620 nm:
⪠Click on the number under "Wavelength" in the view screen. The preset value should disappear and a flashing cursor should appear.
⪠Type in 620.
⪠Press Enter.
⦠Confirm that the A button is selected.
20 Blank the spectrophotometer:
⦠Take a cuvette from the Containers shelf and place it onto the workbench.
⦠Add 5 mL of water from the Materials shelf to the cuvette.
⦠Move the water cuvette into the spectrophotometer's loading well where it says "open". The digital display will show the absorbance once the lid closes.
⦠Use the water as your blank solution by clicking the Zero.
⦠Press the Open button on the spectrophotometer's loading well to remove the cuvette. It will automatically go back to the workbench. Discard it in the recycling bin.
21 Move cuvette 1 into the spectrophotometer's loading well. The digital display will show the absorbance once the lid closes.
22 Record the cuvette's number, contents, and absorbance in your Lab Notes. Remember to press Saves Notes.
23 Press the Open button on the spectrophotometer's loading well to remove the cuvette. It will automatically go back to the workbench.
24 Repeat steps 8 â 10 to identify the absorbance of the remaining two cuvettes.
25 If you zoomed in on the spectrophotometer, press the Re-Set Zoom button in the lower right hand corner of the screen to go back to original view of the lab.
26 Discard the cuvettes and the Erlenmeyer flask in the recycling bin.
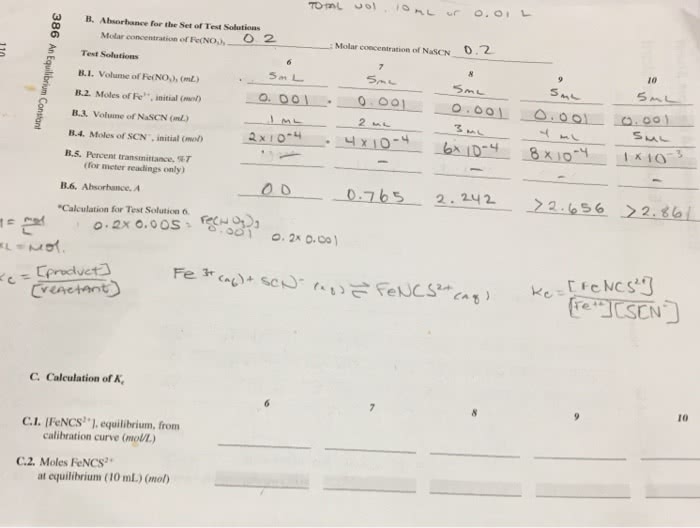
Experiment 2: The Effect of pH on Amylase Enzyme Activity
Part 1: Preparing the Reaction Solutions
1 Take five test tubes from the Containers shelf and place them onto the workbench.
2 Using items found on the Materials shelf, fill the test tubes according to the table below. These will include NaH2PO4 (monosodium phosphate), Na2HPO4 (sodium hydrogen phosphate), and NaHCO3 (sodium bicarbonate).
3 Exp. 2 Reaction Solutions:
Test Tube #1: 6ml 0.1 M Acetic Acid (mL); 1ml Water (mL); 2ml 2% Starch Solution (mL)
Test Tube #2: 6ml 0.1 M NaH2PO4 (mL); 1ml Water (mL); 2ml 2% Starch Solution (mL)
Test Tube #3: 5ml 0.1 M NaH2PO4 (mL); 0.5ml 0.1 M Na2HPO4 (mL); 1.5ml Water (mL); 2ml 2% Starch Solution (mL)
Test Tube #4: 3ml 0.1 M NaH2PO4 (mL); 3ml 0.1 M Na2HPO4 (mL); 1ml Water (mL); 2ml 2% Starch Solution (mL)
Test Tube #5: 1ml Water (mL); 6ml 0.1 M NaHCO3 (mL); 2ml 2% Starch Solution (mL)
Take a pH meter from the Instruments shelf and attach it to test tube 1. If you need a closer look, press the Zoom In button in the lower right hand corner of the screen. Record the pH in your Lab Notes. Remember to press Saves Notes.
47 Repeat step 3 with the remaining test tubes.
48 Discard the pH meter in the recycling bin.
Part 2: Amylase Reactions
1 Take two cuvettes from the Containers shelf and place them onto the workbench.
2 Fill the first cuvette with 4.5 mL of 6 M HCl and the second cuvette with 4.5 mL of iodine solution from the Materials shelf.
3 Add 1 mL of amylase solution from the Materials shelf to test tube 1. Immediately click on the clock icon on the lower left of your workspace to start a timer.
4 After 1 minute, add 0.5 mL of the reaction solution in test tube 1 into cuvette 1, which contains the HCl. Remember, the HCl will stop the reaction between the amylase and the starch.
5 Add 0.5 mL of the reaction solution from cuvette 1 into cuvette 2, containing the yellow iodine solution.
6 Confirm that your spectrophotometer is set to:
⦠Vis
⦠620 nm
⦠A
7 Insert cuvette 2 into the spectrophotometer and record the absorbance in your Lab Notes. Remember to press Saves Notes.
8 Remove the cuvette from the spectrophotometer by pressing the Open button on the spectrophotometer's loading well. It will automatically go back to the workbench.
9 Discard both cuvettes on the workbench into the recycling bin.
10 Repeat the procedure outlined in steps 1 â 9 for the four remaining reaction test tubes.
11 When you are finished, keep the spectrophotometer on the workbench, and discard all the other items.
Experiment 3: The Effect of Temperature on Amylase Enzyme Activity
1 Take a constant temperature bath from the Instruments shelf and place it onto the workbench. Set it by pressing the white circular button until it reaches 10 C.
2 Take a test tube from the Containers shelf and place it onto the workbench.
3 Add the following components from the Materials shelf to the test tube:
⦠3 mL NaH2PO4
⦠3 mL Na2HPO4
⦠2 mL 2% starch solution
⦠1 mL water
4 Move the test tube into the constant temperature bath.
5 Take a thermometer from the Instruments shelf and place it into the test tube.
6 Repeat steps 1 â 5 for three more constant temperature baths, set at 37 C, 50 C, and 80 C, respectively.
7 Place the thermometers in the recycling bin once the temperatures in the test tubes have stabilized at the same temperature of the bath they are in.
8 Take two cuvettes from the Containers shelf and place them onto the workbench.
9 Fill the first cuvette with 4.5 mL of 6 M HCl and the second cuvette with 4.5 mL of iodine solution from the Materials shelf.
10 Add 1 mL of amylase solution from the Materials shelf to test tube 1 in its bath. Immediately click on the clock icon on the lower left of your workspace to start a timer.
11 After 1 minute, remove test tube 1 from its bath and place it on the workbench. Add 0.5 mL of the reaction solution from test tube 1 into cuvette 1, containing the HCl, to stop the reaction.
12 Add 0.5 mL of the reaction solution in cuvette 1 into cuvette 2, containing the yellow iodine solution.
13 Insert cuvette 2 into the spectrophotometer. Confirm that your spectrophotometer is set to:
⦠Vis
⦠620 nm
⦠A
14 Record the absorbance and constant bath temperature in your Lab Notes.
15 Remove the cuvette from the spectrophotometer by pressing the Open button on the spectrophotometer's loading well. It will automatically go back to the workbench.
16 Take a pH meter from the Instruments shelf and place it into the test tube and record the pH in your Lab Notes. Remember to press Saves Notes.
17 Discard the two used cuvettes, the test tube with pH meter, and the constant temperature bath.
18 Repeat steps 8 â 17 for the remaining test tubes.
Note: For the calculations you will perform in the assignments you will assume that, because this solution is very dilute, its density is the same as pure water: 1 g/mL. Therefore, there are 20 mg of starch per mL in the 2% solution.
**Post Lab Question: Plot out your data using a Michaelis-Menton curve. Appropriately label the x- and y-axes (which also includes the appropriate units). Try to draw a best fit curve using your knowledge.
The experimental Data is listed below. In addition to the experimental instructions that were followed. I have updated the lab instructions. This was a LateNite Lab (website) assignment. Please answer the Post Lab question using the provided information. If you think the questio is too long, than anser as much of the qustion as you can. My professor considers this to b one question.
Data:
Experiment #1:
Cuvette #1: 1.03
Cuvette #2: 0.51
Cuvette #3: 0.26
Experiment #2:
Test Tube #1: 2.97
Test Tube #2: 4.69
Test Tube #3: 6.21
Test Tube #4: 7.21
Test Tube #5: 8.33
Experiment #3:
Test Tube #1: 1.03
Test Tube #2: 0.96
Test Tube #3: 0.36
Test Tube #4: 0.40
Test Tube #5: 0.83
Experiment #4:
Test Tube #1: 0.66 / Temperature 10 Celsius / pH 7.21
Test Tube #2: 0.24 / Temp 37 Celsius / pH 7.21
Test Tube #3: 0.33 / Temp 50 Celsius / pH 7.21
Test Tube #4: 1.03 / Temp 80 Celsius / pH 7.21
About This Lab
In this lab, you will use spectrophotometry to follow the reaction of the amylase enzyme on starch molecules. You will examine the effects that environmental pH and temperature have on the rate of amylase digestion of starch. This will be observed by using iodine to test for the presence of starch. Iodine interacts with starch to form a dark blue-black color. As amylase breaks down starch, less and less starch is present, so the color of the iodine test solution becomes lighter and lighter until only the amber color of iodine will be seen.
In order to stop the reactions at a specific time, a strong acid, HCl, is added to the amylase solution. As the pH falls below the functional pH of the enzyme the reaction stops.
Procedures
Experiment 1: Creating a Calibration Curve for Starch-Iodine Measurements
1 Take three cuvettes from the Containers shelf and place them onto the workbench.
2 Take an Erlenmeyer flask from the Containers shelf and place it onto the workbench.
3 Add 0.25 mL of the 2% starch solution from the Materials shelf to the Erlenmeyer flask. Note: For the calculations you will perform in the assignments you will assume that, because this solution is very dilute, its density is the same as pure water: 1 g/mL. Therefore, there are 20 mg of starch per mL in the 2% solution.
4 Add 99.75 mL of water from the Materials shelf to the Erlenmeyer flask to obtain a dilute solution that is 1/400th the concentration of the original 2% starch solution on the shelf.
5 Using the dilute starch solution from the Erlenmeyer flask on the workbench and the iodine solution found on the Materials shelf, fill the three cuvettes as follows:
6 Exp. 1 Cuvette Set-up
7 Cuvette Name
8 Dilute Starch Solution (mL)
9 Iodine (mL)
Cuvette #1: 4ml Dilute Starch; 1ml Iodine
Cuvette #2: 2ml Dilute Starch; 3ml Iodine
Cuvette #3: 1ml Dilute Starch; 4ml Iodine
Take a spectrophotometer from the Instruments shelf and place it onto the workbench. Using the control panel:
⦠Select the Vis button. A button that is selected has a gray background and blue font. The "Mode" should change to Vis in the view screen.
⦠Set the wavelength to 620 nm:
⪠Click on the number under "Wavelength" in the view screen. The preset value should disappear and a flashing cursor should appear.
⪠Type in 620.
⪠Press Enter.
⦠Confirm that the A button is selected.
20 Blank the spectrophotometer:
⦠Take a cuvette from the Containers shelf and place it onto the workbench.
⦠Add 5 mL of water from the Materials shelf to the cuvette.
⦠Move the water cuvette into the spectrophotometer's loading well where it says "open". The digital display will show the absorbance once the lid closes.
⦠Use the water as your blank solution by clicking the Zero.
⦠Press the Open button on the spectrophotometer's loading well to remove the cuvette. It will automatically go back to the workbench. Discard it in the recycling bin.
21 Move cuvette 1 into the spectrophotometer's loading well. The digital display will show the absorbance once the lid closes.
22 Record the cuvette's number, contents, and absorbance in your Lab Notes. Remember to press Saves Notes.
23 Press the Open button on the spectrophotometer's loading well to remove the cuvette. It will automatically go back to the workbench.
24 Repeat steps 8 â 10 to identify the absorbance of the remaining two cuvettes.
25 If you zoomed in on the spectrophotometer, press the Re-Set Zoom button in the lower right hand corner of the screen to go back to original view of the lab.
26 Discard the cuvettes and the Erlenmeyer flask in the recycling bin.
Experiment 2: The Effect of pH on Amylase Enzyme Activity
Part 1: Preparing the Reaction Solutions
1 Take five test tubes from the Containers shelf and place them onto the workbench.
2 Using items found on the Materials shelf, fill the test tubes according to the table below. These will include NaH2PO4 (monosodium phosphate), Na2HPO4 (sodium hydrogen phosphate), and NaHCO3 (sodium bicarbonate).
3 Exp. 2 Reaction Solutions:
Test Tube #1: 6ml 0.1 M Acetic Acid (mL); 1ml Water (mL); 2ml 2% Starch Solution (mL)
Test Tube #2: 6ml 0.1 M NaH2PO4 (mL); 1ml Water (mL); 2ml 2% Starch Solution (mL)
Test Tube #3: 5ml 0.1 M NaH2PO4 (mL); 0.5ml 0.1 M Na2HPO4 (mL); 1.5ml Water (mL); 2ml 2% Starch Solution (mL)
Test Tube #4: 3ml 0.1 M NaH2PO4 (mL); 3ml 0.1 M Na2HPO4 (mL); 1ml Water (mL); 2ml 2% Starch Solution (mL)
Test Tube #5: 1ml Water (mL); 6ml 0.1 M NaHCO3 (mL); 2ml 2% Starch Solution (mL)
Take a pH meter from the Instruments shelf and attach it to test tube 1. If you need a closer look, press the Zoom In button in the lower right hand corner of the screen. Record the pH in your Lab Notes. Remember to press Saves Notes.
47 Repeat step 3 with the remaining test tubes.
48 Discard the pH meter in the recycling bin.
Part 2: Amylase Reactions
1 Take two cuvettes from the Containers shelf and place them onto the workbench.
2 Fill the first cuvette with 4.5 mL of 6 M HCl and the second cuvette with 4.5 mL of iodine solution from the Materials shelf.
3 Add 1 mL of amylase solution from the Materials shelf to test tube 1. Immediately click on the clock icon on the lower left of your workspace to start a timer.
4 After 1 minute, add 0.5 mL of the reaction solution in test tube 1 into cuvette 1, which contains the HCl. Remember, the HCl will stop the reaction between the amylase and the starch.
5 Add 0.5 mL of the reaction solution from cuvette 1 into cuvette 2, containing the yellow iodine solution.
6 Confirm that your spectrophotometer is set to:
⦠Vis
⦠620 nm
⦠A
7 Insert cuvette 2 into the spectrophotometer and record the absorbance in your Lab Notes. Remember to press Saves Notes.
8 Remove the cuvette from the spectrophotometer by pressing the Open button on the spectrophotometer's loading well. It will automatically go back to the workbench.
9 Discard both cuvettes on the workbench into the recycling bin.
10 Repeat the procedure outlined in steps 1 â 9 for the four remaining reaction test tubes.
11 When you are finished, keep the spectrophotometer on the workbench, and discard all the other items.
Experiment 3: The Effect of Temperature on Amylase Enzyme Activity
1 Take a constant temperature bath from the Instruments shelf and place it onto the workbench. Set it by pressing the white circular button until it reaches 10 C.
2 Take a test tube from the Containers shelf and place it onto the workbench.
3 Add the following components from the Materials shelf to the test tube:
⦠3 mL NaH2PO4
⦠3 mL Na2HPO4
⦠2 mL 2% starch solution
⦠1 mL water
4 Move the test tube into the constant temperature bath.
5 Take a thermometer from the Instruments shelf and place it into the test tube.
6 Repeat steps 1 â 5 for three more constant temperature baths, set at 37 C, 50 C, and 80 C, respectively.
7 Place the thermometers in the recycling bin once the temperatures in the test tubes have stabilized at the same temperature of the bath they are in.
8 Take two cuvettes from the Containers shelf and place them onto the workbench.
9 Fill the first cuvette with 4.5 mL of 6 M HCl and the second cuvette with 4.5 mL of iodine solution from the Materials shelf.
10 Add 1 mL of amylase solution from the Materials shelf to test tube 1 in its bath. Immediately click on the clock icon on the lower left of your workspace to start a timer.
11 After 1 minute, remove test tube 1 from its bath and place it on the workbench. Add 0.5 mL of the reaction solution from test tube 1 into cuvette 1, containing the HCl, to stop the reaction.
12 Add 0.5 mL of the reaction solution in cuvette 1 into cuvette 2, containing the yellow iodine solution.
13 Insert cuvette 2 into the spectrophotometer. Confirm that your spectrophotometer is set to:
⦠Vis
⦠620 nm
⦠A
14 Record the absorbance and constant bath temperature in your Lab Notes.
15 Remove the cuvette from the spectrophotometer by pressing the Open button on the spectrophotometer's loading well. It will automatically go back to the workbench.
16 Take a pH meter from the Instruments shelf and place it into the test tube and record the pH in your Lab Notes. Remember to press Saves Notes.
17 Discard the two used cuvettes, the test tube with pH meter, and the constant temperature bath.
18 Repeat steps 8 â 17 for the remaining test tubes.

Related textbook solutions

Basic Chemistry
Principles of Chemistry Molecular Approach

Chemistry: Structure and Properties

Principles of Chemistry Molecular Approach
Chemistry: A Molecular Approach
Chemistry: A Molecular Approach
Principles of Chemistry: A Molecular Approach