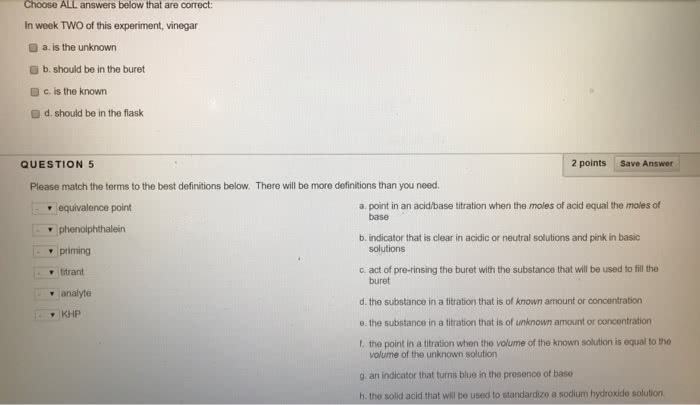
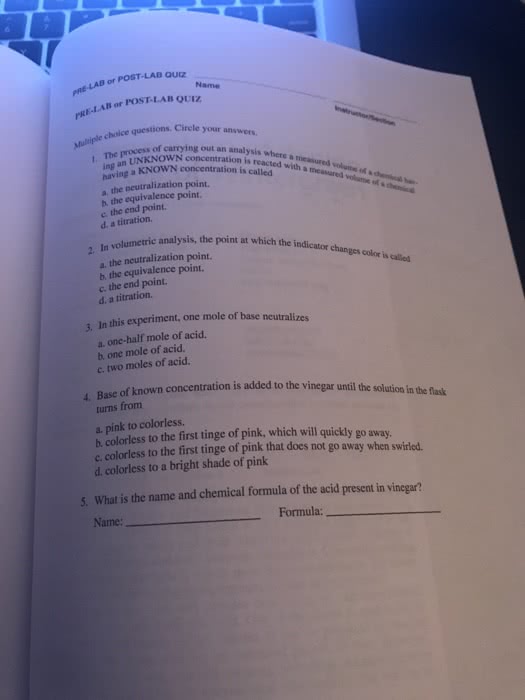
Titration is a technique used to find the concentration of a solution of known composition. For example, you may have a solution of hydrochloric acid whose concentration is known approximately and you want to determine the exact concentration. Or you may want to test a vitamin C supplement to see whether it really contains the stated amount of Vitamin C. Titration is a volumetric technique. A volumetric technique means that the concentration is determined by comparing the volume of a solution of known concentration to the volume of the unknown solution. The two solutions are combined until a known condition is achieved, such as the neutralization is an acid by a base. This is known as the equivalence point. The volumes of the two solutions with the known concentration of the base gives the concentration of the acid. Titration Materials There are three substances in every titration: ⢠the analyte â the solution in the reaction vessel ⢠the titrant â the solution that is being delivered into the reaction vessel ⢠the indicator â a Bronsted-Lowry conjugate acid-base pair, where the acid form of the indicator is a different color than the base. The indicator changes color at the end point. A typical indicator is phenolphthalein, which is colorless in the presence of an acid and pink in the presence of a base. During the titration, the indicator reacts with the other chemical compounds, so it is important to minimize the amount of indicator added. Titration Procedure For the titration of NaOH (a strong base) with HCl (a strong acid), phenolphthalein is a good indicator because it changes color at a pH that is close to the equivalence point. In a range of acidic to neutral solution (pH < 7), phenolphthalein is colorless, but as the solution becomes basic, at around a pH of 8.2, phenolphthalein turns pink. The glass container used to deliver precise quantities of titrant into the analyte is called a burette. It is a long glass tube that has finely marked graduations every 0.1 mL and a stopcock valve at the bottom. A 50 mL burette is about 1 meter long and can be read to an accuracy of 0.01 mL. The burette is filled to the top with a solution of known concentration, and a flask is filled with a solution of unknown concentration. A small amount of an indicator is also added to the flask to visualize the equivalence point. The titration is performed by progressively adding the reactant in the burette to a known volume of the other reactant in the flask. The reaction vessel with an indicator is placed beneath the burette. The stopcock is turned to allow the titrant to flow slowly into the flask. Titrant is added in increments, and after each increment the flask is swirled and checked for a color change. Here is where you have a decision to make. On the one hand, you want to be as exact as possible in order to get good results. On the other hand, it would take hours to add titrant one drop at a time from the beginning until the end point. The accepted technique, therefore, is to perform two titrations. The first is a coarse titration performed by adding relatively large increments of titrant. For example, you could add titrant (from the buret) in 2 mL increments. You will not get exact results, but you will quickly determine a narrow range in which the end point occurs. Suppose that with the phenolphthalein indicator, the color in the flask is colorless after addition of 20 mL of titrant, but it turns pink after the next 2 mL of titrant is added. You can conclude that the end point must lie between 20 and 22 mL. A second, fine titration is performed by refilling the burette to the titrant and using a new flask containing your second reactant. You already know that the end point occurs after 20 mL of titrant is added, so the first step is to go ahead and add nearly the whole 20 mL at once. Then you start adding titrant in much smaller quantities, say 0.2 mL at a time. You may even switch to adding single drops. This way, you can catch the end point of the titration to an accuracy of one or two drops. Be sure to swirl the flask after each addition, or even while you are adding the titrant. It is also possible to use a pH meter to identify the equivalence point. In this case, you would still perform two titrations, one coarse and one fine. The difference from using an indicator is that you would record all of the pH values and construct a graph of the pH vs. volume of added titrant. The point of inflection of the curve between the acid and base regions indicates the equivalence point. At the equivalence point, the analyte from the burette has neutralized the reactant in the flask. In an acid-base reaction, this means that the flask contains the same number of moles of both acid and base as long as the acid is monoprotic (an acid that gives up only one proton when it dissociates in water). Determining the Concentration of an Unknown You will use several equations to determine the concentration of the unknown using the measurements you will make in the lab. M(known) x V(known,L) = moles known moles known x (stoichiometric conversion, mols to mols step) = moles unknown (moles unknown) / V(unknown,L) = M unknown Procedure: Procedures 1. Move your mouse cursor over the hydrochloric acid (HCl) and sodium hydroxide(NaOH) on the Materials shelf. You will see that the concentration of the sodium hydroxide is known to be 0.1 M while the concentration of hydrochloric acid is unknown. 2. Take a burette from the Containers shelf and place it on the workbench. 3. Add 50 mL of sodium hydroxide (NaOH) titrant. (50 mL is the capacity of a burette). Notice that it doesn't fill completely to the top mark. This is because there is space in the burette below the bottom mark. In addition, this is NOT the volume in the burette but rather this is your INITIAL READING. In the wet lab, you would need to let some of the solution flow through the stopcock in order to assure that the NaOH solution completely filled the volume of the burette down to the tip. You don't have to do that here. 4. Note the buret reading as your initial NaOH volume (mL). You can double click on the buret and select show close up to view the volume more closely. 5. Take a clean Erlenmeyer flask from the Containers shelf and place it on the workbench. 6. Add 10 mL of hydrochloric acid(HCl), unknown concentration, to the Erlenmeyer flask. Record the volume of HCL (mL) in the data table. 7. Add 10 mL of water to the Erlenmeyer flask. This increases the total volume in the flask, making it easier to see the color change, but note that the value to use for the volume of hydrochloric acid HCl when calculating its concentration is still 10 mL. 8. Add 2 drops of phenolphthalein solution to the Erlenmeyer flask. 9. Move the Erlenmeyer flask anywhere on the base of the burette. The Erlenmeyer flask is connected to the burette so that liquid will drip from the burette into the Erlenmeyer Flask. 10. Flow of the titrant from the burette is controlled by the black knob at the bottom of the burette glass tube. You can deliver one drop of titrant with each short click of the black knob, and you can deliver a stream of titrant from the burette by clicking-and-holding the black knob - the longer you hold the knob, the more titrant will be delivered all at once. Here is what the setup on your workbench should look like: 11. You are now ready to start the first coarse titration. Try to find the length of time required to click and hold the burette knob so that you deliver approximately 2 mL of sodium hydroxide from the burette to the Erlenmeyer flask. After each click of the knob, move the mouse cursor over the burette â this will enable you to see its current volume. To determine the amount of titrant delivered from the beginning until now, subtract the amount of liquid currently in the burette from the starting volume. 12. Continue to add the sodium hydroxide titrant in 2 mL increments. Each time, note the burette volume level. Note when the end point is passed (when the color of your solution changes). You now know between which two readings the endpoint occurred. For example, if you recorded 32 mL before the end point, but 34 mL was past the endpoint, record the 32 mL as your FINAL NaOH (mL). Calculate the volume of titrant that was added when 32 mL were delivered (subtract your INITIAL NaOH (mL) reading). You know that the FINE TITRATION can begin after approximately that amount of titrant. 13. Remove the Erlenmeyer flask from the burette and place them both in the Recycle Bin. 14. Take a clean Erlenmeyer flask from the Containers shelf and place it on the workbench. 15. Add 10 mL of hydrochloric acid, 10 mL of Water and 2 drops of phenolphthalein to the Erlenmeyer flask. 16. Place the Erlenmeyer flask at the base of a new burette. 17. Add 50 mL of sodium hydroxide titrant to the burette. 18. Add the initial large quantity of titrant, determined performing the coarse titration, (which in the example in #10, was 16 mL) so that you can begin with the fine titration. The solution in the Erlenmeyer flask should still be colorless. 19. Add sodium hydroxide from the burette drop-wise. This means adding a single drop at time which is done with single, short clicks on the black knob. You may decide to click and hold for short times, but in doing so you may miss the exact endpoint of the titration. 20. When the solution in the Erlenmeyer flask changes color, stop adding titrant. Record FINAL NaOH (mL) reading in the data table. Calculate the NaOH Delivered (mL) by subtracting the initial reading from the final reading. Record both values in the data table. 21. In theory, we would repeat at least two more FINE TITRATIONS with fresh samples of HCl and full burets. However, since this is just a tutorial, exit the lab once you have a recorded the data in the data table. Data: This includes all observations and questions posed to you 1. For your most exact titration, record the following: a Volume of NaOH solution in the burette at the start (mL): 50.00ml b Volume of NaOH solution in the burette at the end (mL): 33.65ml c Volume of NaOH solution delivered to the flask (mL): 16.35ml d Volume of HCl solution in the flask (mL) 10.0ml 2. Calculate the molarity of the HCl. this is the value I come up with i need help calculate the molarity of acid
Titration is a technique used to find the concentration of a solution of known composition. For example, you may have a solution of hydrochloric acid whose concentration is known approximately and you want to determine the exact concentration. Or you may want to test a vitamin C supplement to see whether it really contains the stated amount of Vitamin C. Titration is a volumetric technique. A volumetric technique means that the concentration is determined by comparing the volume of a solution of known concentration to the volume of the unknown solution. The two solutions are combined until a known condition is achieved, such as the neutralization is an acid by a base. This is known as the equivalence point. The volumes of the two solutions with the known concentration of the base gives the concentration of the acid. Titration Materials There are three substances in every titration: ⢠the analyte â the solution in the reaction vessel ⢠the titrant â the solution that is being delivered into the reaction vessel ⢠the indicator â a Bronsted-Lowry conjugate acid-base pair, where the acid form of the indicator is a different color than the base. The indicator changes color at the end point. A typical indicator is phenolphthalein, which is colorless in the presence of an acid and pink in the presence of a base. During the titration, the indicator reacts with the other chemical compounds, so it is important to minimize the amount of indicator added. Titration Procedure For the titration of NaOH (a strong base) with HCl (a strong acid), phenolphthalein is a good indicator because it changes color at a pH that is close to the equivalence point. In a range of acidic to neutral solution (pH < 7), phenolphthalein is colorless, but as the solution becomes basic, at around a pH of 8.2, phenolphthalein turns pink. The glass container used to deliver precise quantities of titrant into the analyte is called a burette. It is a long glass tube that has finely marked graduations every 0.1 mL and a stopcock valve at the bottom. A 50 mL burette is about 1 meter long and can be read to an accuracy of 0.01 mL. The burette is filled to the top with a solution of known concentration, and a flask is filled with a solution of unknown concentration. A small amount of an indicator is also added to the flask to visualize the equivalence point. The titration is performed by progressively adding the reactant in the burette to a known volume of the other reactant in the flask. The reaction vessel with an indicator is placed beneath the burette. The stopcock is turned to allow the titrant to flow slowly into the flask. Titrant is added in increments, and after each increment the flask is swirled and checked for a color change. Here is where you have a decision to make. On the one hand, you want to be as exact as possible in order to get good results. On the other hand, it would take hours to add titrant one drop at a time from the beginning until the end point. The accepted technique, therefore, is to perform two titrations. The first is a coarse titration performed by adding relatively large increments of titrant. For example, you could add titrant (from the buret) in 2 mL increments. You will not get exact results, but you will quickly determine a narrow range in which the end point occurs. Suppose that with the phenolphthalein indicator, the color in the flask is colorless after addition of 20 mL of titrant, but it turns pink after the next 2 mL of titrant is added. You can conclude that the end point must lie between 20 and 22 mL. A second, fine titration is performed by refilling the burette to the titrant and using a new flask containing your second reactant. You already know that the end point occurs after 20 mL of titrant is added, so the first step is to go ahead and add nearly the whole 20 mL at once. Then you start adding titrant in much smaller quantities, say 0.2 mL at a time. You may even switch to adding single drops. This way, you can catch the end point of the titration to an accuracy of one or two drops. Be sure to swirl the flask after each addition, or even while you are adding the titrant. It is also possible to use a pH meter to identify the equivalence point. In this case, you would still perform two titrations, one coarse and one fine. The difference from using an indicator is that you would record all of the pH values and construct a graph of the pH vs. volume of added titrant. The point of inflection of the curve between the acid and base regions indicates the equivalence point. At the equivalence point, the analyte from the burette has neutralized the reactant in the flask. In an acid-base reaction, this means that the flask contains the same number of moles of both acid and base as long as the acid is monoprotic (an acid that gives up only one proton when it dissociates in water). Determining the Concentration of an Unknown You will use several equations to determine the concentration of the unknown using the measurements you will make in the lab. M(known) x V(known,L) = moles known moles known x (stoichiometric conversion, mols to mols step) = moles unknown (moles unknown) / V(unknown,L) = M unknown Procedure: Procedures 1. Move your mouse cursor over the hydrochloric acid (HCl) and sodium hydroxide(NaOH) on the Materials shelf. You will see that the concentration of the sodium hydroxide is known to be 0.1 M while the concentration of hydrochloric acid is unknown. 2. Take a burette from the Containers shelf and place it on the workbench. 3. Add 50 mL of sodium hydroxide (NaOH) titrant. (50 mL is the capacity of a burette). Notice that it doesn't fill completely to the top mark. This is because there is space in the burette below the bottom mark. In addition, this is NOT the volume in the burette but rather this is your INITIAL READING. In the wet lab, you would need to let some of the solution flow through the stopcock in order to assure that the NaOH solution completely filled the volume of the burette down to the tip. You don't have to do that here. 4. Note the buret reading as your initial NaOH volume (mL). You can double click on the buret and select show close up to view the volume more closely. 5. Take a clean Erlenmeyer flask from the Containers shelf and place it on the workbench. 6. Add 10 mL of hydrochloric acid(HCl), unknown concentration, to the Erlenmeyer flask. Record the volume of HCL (mL) in the data table. 7. Add 10 mL of water to the Erlenmeyer flask. This increases the total volume in the flask, making it easier to see the color change, but note that the value to use for the volume of hydrochloric acid HCl when calculating its concentration is still 10 mL. 8. Add 2 drops of phenolphthalein solution to the Erlenmeyer flask. 9. Move the Erlenmeyer flask anywhere on the base of the burette. The Erlenmeyer flask is connected to the burette so that liquid will drip from the burette into the Erlenmeyer Flask. 10. Flow of the titrant from the burette is controlled by the black knob at the bottom of the burette glass tube. You can deliver one drop of titrant with each short click of the black knob, and you can deliver a stream of titrant from the burette by clicking-and-holding the black knob - the longer you hold the knob, the more titrant will be delivered all at once. Here is what the setup on your workbench should look like: 11. You are now ready to start the first coarse titration. Try to find the length of time required to click and hold the burette knob so that you deliver approximately 2 mL of sodium hydroxide from the burette to the Erlenmeyer flask. After each click of the knob, move the mouse cursor over the burette â this will enable you to see its current volume. To determine the amount of titrant delivered from the beginning until now, subtract the amount of liquid currently in the burette from the starting volume. 12. Continue to add the sodium hydroxide titrant in 2 mL increments. Each time, note the burette volume level. Note when the end point is passed (when the color of your solution changes). You now know between which two readings the endpoint occurred. For example, if you recorded 32 mL before the end point, but 34 mL was past the endpoint, record the 32 mL as your FINAL NaOH (mL). Calculate the volume of titrant that was added when 32 mL were delivered (subtract your INITIAL NaOH (mL) reading). You know that the FINE TITRATION can begin after approximately that amount of titrant. 13. Remove the Erlenmeyer flask from the burette and place them both in the Recycle Bin. 14. Take a clean Erlenmeyer flask from the Containers shelf and place it on the workbench. 15. Add 10 mL of hydrochloric acid, 10 mL of Water and 2 drops of phenolphthalein to the Erlenmeyer flask. 16. Place the Erlenmeyer flask at the base of a new burette. 17. Add 50 mL of sodium hydroxide titrant to the burette. 18. Add the initial large quantity of titrant, determined performing the coarse titration, (which in the example in #10, was 16 mL) so that you can begin with the fine titration. The solution in the Erlenmeyer flask should still be colorless. 19. Add sodium hydroxide from the burette drop-wise. This means adding a single drop at time which is done with single, short clicks on the black knob. You may decide to click and hold for short times, but in doing so you may miss the exact endpoint of the titration. 20. When the solution in the Erlenmeyer flask changes color, stop adding titrant. Record FINAL NaOH (mL) reading in the data table. Calculate the NaOH Delivered (mL) by subtracting the initial reading from the final reading. Record both values in the data table. 21. In theory, we would repeat at least two more FINE TITRATIONS with fresh samples of HCl and full burets. However, since this is just a tutorial, exit the lab once you have a recorded the data in the data table. Data: This includes all observations and questions posed to you 1. For your most exact titration, record the following: a Volume of NaOH solution in the burette at the start (mL): 50.00ml b Volume of NaOH solution in the burette at the end (mL): 33.65ml c Volume of NaOH solution delivered to the flask (mL): 16.35ml d Volume of HCl solution in the flask (mL) 10.0ml 2. Calculate the molarity of the HCl. this is the value I come up with i need help calculate the molarity of acid


Related textbook solutions
Basic Chemistry
Principles of Chemistry Molecular Approach

Chemistry: Structure and Properties

Principles of Chemistry Molecular Approach
Chemistry: A Molecular Approach
Chemistry: A Molecular Approach
Principles of Chemistry: A Molecular Approach